Transformers rarely fail, and when they do, it’s usually caused by people not turning the power off when they are moving wires and the 24VAC wires touch. Sometimes a failed solenoid could cause transformer problems but the timer usually shuts off and issues a FUS message before the transformer is damaged. Some models also have fuses on the back terminal board that helps protect it.
A note of caution – the transformer is connected to your household 110/120VAC power, which is dangerous. Be sure to take precautions by turning off the power before working on the unit. You should not attempt it unless you are experienced enough to do so. This post does not contain sufficient information to work with these voltages safely; If in doubt, contact someone who is qualified.
Most of the time people think that the transformer is bad when it isn’t, Follow the DIY page topic on ‘How to test if the transformer is good’ to know for sure.
Testing the transformer with a resistance meter
As one optional and additional check before you tear it apart, you can use a multimeter to perform some simple transformer checks.
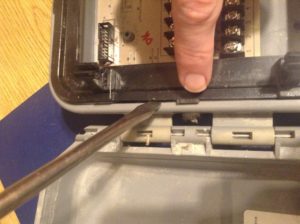
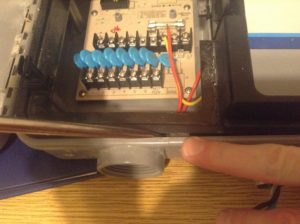
Turn off the power and disconnect the AC power connection at the bottom of the transformer case on the right-hand side. There should be black, white, and green wires. Remove the timer ribbon cable from the back terminal board. Your multimeter’s resistance measurement settings should be set to the lowest resistance range. e.g., 0-50ohms…
- Measure the resistance between the transformer output wires, the thick red and yellow wires connected to the 24VAC terminals. It should measure around 1.5-2.5 ohms.
- Measure the input side of the transformer between the black and white wires. This should measure around 20-24ohms.
If either one measures open, you know the transformer is bad and must be replaced.
Removing the Transformer
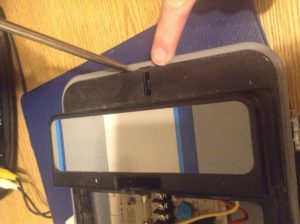
If you conclude that the transformer is bad, you can use the following information to help you understand how to replace it. I generally start on the left side and work my way around counter-clockwise. REMOVE THE KEY FIRST, or it can be difficult to remove later.
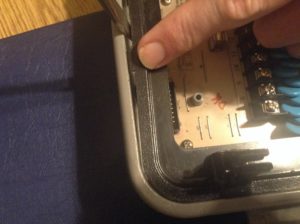
After removing the case, you’ll see how the transformer is connected into the case. You can often find them on ebay or at a local landscape supply store.It should be rated for 1.25A, 24VAC.
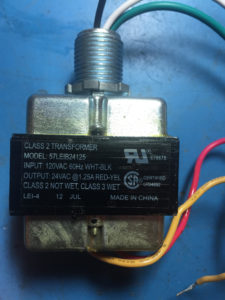
The transformer typically looks like this.
If this info has helped you, please consider making a donation – we depend on you to keep this information available.
Note, some newer transformers have an additional green wire coming out the bottom (reference the photo above). Keep reading for more information about it.
2020 Update on the green wire or ground wire found on newer transformers:
Background Material for understanding grounding, green wire ground, surge protection:
Irritrol has had surge protection circuitry on their newer back terminal boards for a long time. It’s provided by those “blue” capacitor looking components that are actually MOV or TVS devices. They do not not work unless they have a ground path for surge current follow. Irritrol’s previous transformers never brought the ground wire out into the compartment where the back terminal board is for you to easily access it. It was assumed that the ‘user/installer’ would run a separate ground wire to the back terminal board for this purpose. Unfortunately, there was no way to route the ground wire from the ac mains to the compartment without drilling some holes and adding your own wire. Alternately, and preferably, the user was expected to bring in a separate ground wire through the portal with the valve wires and tie it to a grounding rod. Adding your own grounding was a hassle and expense and basically no one ever did it. I’d estimate that 99% of customers never had a ground wire hooked up at all, causing the surge protection circuity to be useless.
To fix this, (20+ years later) Irritrol started manufacturing transformers with the AC ground wire passed through from the AC Mains side through to the main compartment. There are now 3 wires; red, yellow, and green (or maybe green/yellow-stripe). Although not as good as having your own grounding rod, this is much better than nothing and now that it is “conveniently accessible”, people will or at least should use it.
Now to answer your question.
If you have a newer transformer with a green wire that wasn’t there before, connect it as follows:
1) If your terminal board has a GND or Earth Ground screw terminal, connect the wire to this terminal.
2) If you don’t have that terminal, but have a smaller, unlabeled screw terminal located below the 24VAC terminals, connect it to this terminal.
3) If you don’t have either of the above terminals on your back terminal board, simply connect the green wire ground in the VC terminal
with any other VC wires. (Usually these wires, by convention, are white, but they don’t have to be)
4) Of course, if you have your own grounding system (rod, etc.) already in place, use it instead and just cap the green wire off with tape or a wire nut so it doesn’t touch anything else.
Note that it does not matter what order you put the red and yellow wires on the 24VAC terminals; either way is fine, but “R”ed on the “R”ight is a common convention.
If this has been helpful, please consider making a donation on my site; I don’t get paid by Irritrol or any company for the service and the proceeds go towards kids education and to keep this site going.
Good luck,
Brian, Jen, Meghan and Ben – the rainDialDoctors